
USB port of a computer or laptop does not work, what should I do?
- The essence of the problem
- Physical examination
- Restart computer
- Use the Device Manager application
- Testing USB Universal Serial Bus Controllers
- Check hardware configuration
- Uninstalling "USB Host Controllers"
- Clear “Device Manager”
- Disable "Temporary disable USB port"
- Method One : Using Power Settings
- Method Two : Using the Registry Editor Application
- Fix damaged equipment
- Conclusion
Read how to diagnose and fix broken USB port of a computer or laptop . Ways to solve the problem at home. Recently, the amount of information surrounding us has increased unusually. We get information from everywhere: personal computers, mobile phones, the Internet, television, radio, etc. The main types of professional activity are completely, or for the most part, transferred to the use of computer devices. Documentation, archives, correspondence, databases, etc. - This is only a small part of where personal computers are used. The main requirements for computer devices are their speed, reliability and the ability to store a large amount of information.  Content:
- The essence of the problem.
- Physical examination.
- Reboot the computer.
- Use the Device Manager application.
- Checking USB Universal Serial Bus Controllers.
- Check hardware configuration.
- Uninstall "USB Host Controllers".
- Clear the "Device Manager".
- Disable "Temporary disable USB port":
The essence of the problem
Manufacturers of computer components are constantly improving their products, offering the end user much more opportunities compared with previous versions of devices.
One of the main roles in the modern world is played by the mobility of information and the ability to access it at any time. Often there is a need to use certain documents in various places, and it is necessary that access to information be permanent.
Recently, cloud storage has become very popular, allowing you to store a large amount of personal information and provide access to it at any time. However, if the user, for any reason, does not want to store information in the cloud storage, for example, to protect it from possible access by third parties or possible hacking, then he uses external "USB-drives" and drives connected to the computer via "USB port" .
This is quite convenient, as computer device manufacturers supply their products with a sufficient number of “USB ports” . And the user can always get or download the necessary information to his device through such a “USB connection” .
However, not in all cases, the process of information exchange through the “USB-port” can end successfully. It often happens that you connected the “USB-drive” to a computer the day before, and today it is not detected. However, this drive works on other “USB ports” of your computer. Then, probably, the problem can be directly in a certain "USB-port" .
This is one of those computer problems that happens so rarely that users tend to blame the “USB drive” for it . Therefore, simply switch it to another location and continue to work. Not assuming that the "USB-port" may be faulty, and do not pay proper attention to it.
However, “USB devices” are still at the peak of their popularity and show no signs of slowing down. “USB flash drives” , “USB chargers” for your phone, “USB” for connecting “iPod” , “USB coffee heaters” , “USB” for connecting additional devices (for example, lamp, camera, microphone and etc.) - as you can see, “USB connection” is used everywhere! Therefore, it is imperative that all your ports are operational.
Below, we will present certain actions that will help you test your “USB port” for the problem of determining “USB devices” , and offer some tips on how to fix it. After each completed action, check if the problem is resolved. If the action did not help, then proceed to the next.
A prerequisite for testing and troubleshooting possible USB ports is to log in to the Windows system with an administrator account. If the computer is your own personal computer, then, most likely, you are already logged in with such an account. For a working (office) computer, you will have to contact your system administrator for help.
Physical examination
The first thing you need to do is check the “USB port” for physical damage.
A simple test is to connect your “USB-drive” to the port and see how easily the drive moves in the port connector. But be careful not to cause additional hardware problems if you don’t already have one. If you do not know how durable the “USB port” should be, do the same action on the control port, which, as you know, works, and compare them both.
If the amplitude of wiggle is large enough and the connector is loose, then go to the end of this article, where we will talk about problems with the “USB-port” equipment. Otherwise, continue with the following steps.
Restart computer
Before taking any steps, try the old way to fix technical problems: turn off the computer and turn it on again. Sometimes it helps by forcing the operating system to scan for hardware, such as “USB port” , and restore its functionality.
If this method did not work, then it’s time to use the Device Manager application .
Use the Device Manager application
The application contains information about all devices connected or installed on your personal computer, and provides the ability to configure, configure and monitor each of them.
The Device Manager application window can be opened in various ways. For example, we show several of these methods, and you can use the most convenient for you.
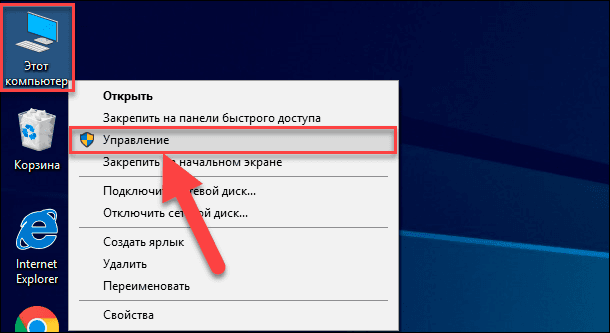
Method one : Open the Computer Management application window, for example, right-click on the desktop’s “This Computer” file explorer shortcut on the desktop and select the Management section in the pop-up menu.
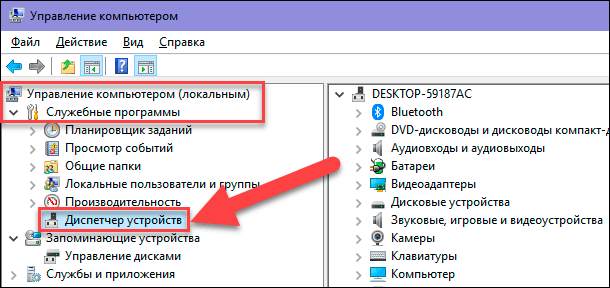
This application allows you to fully manage your computer and related utilities. In the left pane of the Computer Management window , select the Device Manager section located in the Utilities folder in the Computer Management (Local) directory.
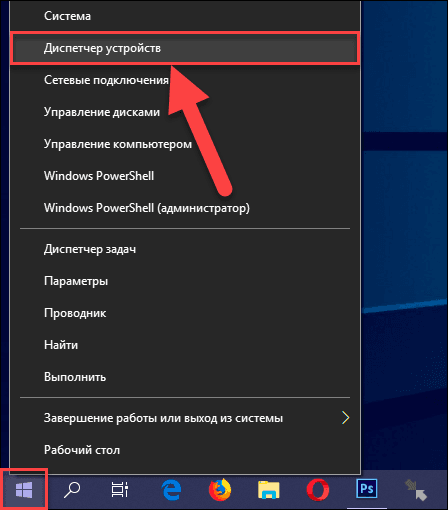
Method two : On the "Taskbar" in the lower left corner of the desktop, locate the "Start" button and right-click on it, or press the "Windows + X" key combination together. In the pop-up menu that opens, select the "Device Manager" section from the list of available applications.
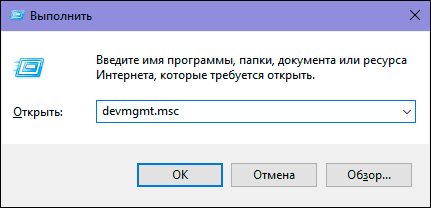
Method Three : Press the "Windows + R" key combination together and open the "Run" dialog box. Enter “devmgmt.msc” in the “Open” field, and then press the “Enter” key on the keyboard or the “OK” button to execute the command.
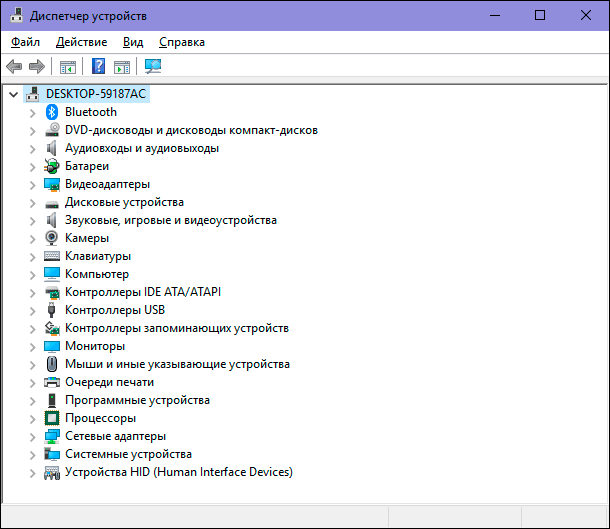
The Device Manager application will open and you will see the following window:
Testing USB Universal Serial Bus Controllers
The Device Manager application shows all categories of devices installed on your computer. At this point, you need to look at the universal serial bus controller records. Click the arrow next to the USB Controllers section to expand attached devices. You will see a list of available controllers, similar to our example:
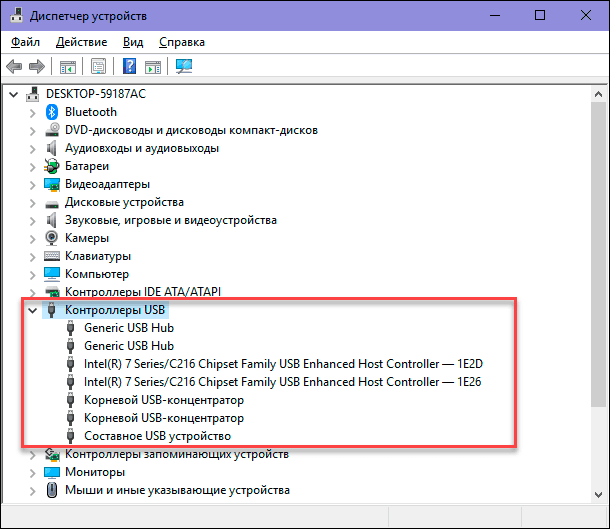
This list will not be of special importance to you. However, it is important to pay attention to the following entry: "Intel (R) 7 Series / C216 Chipset Family USB Enhanced Host Controller . " This is a special type of "USB controller" directly for our computer, it will be different for you. But the key words here are “USB Host Controller” . Find them in your Device Manager . If you cannot find them, then this may be your problem.
Check hardware configuration
Click the “Update hardware configuration” button on the toolbar of the “Device Manager” application under the ribbon of the main menu shown in the figure below. This will force your computer to re-check all your hardware and update it. This action may help, and you will see the “USB Host Controller” on your list. If the controller does not appear in the list, it means that the problem is not fixed.

Uninstalling "USB Host Controllers"
At this stage, things get a little more complicated. You will have to delete all controllers in the Device Manager application . Please note that if you work on a personal computer, and your keyboard and mouse are connected to its “USB ports” , then after removing the controllers, they will stop working.
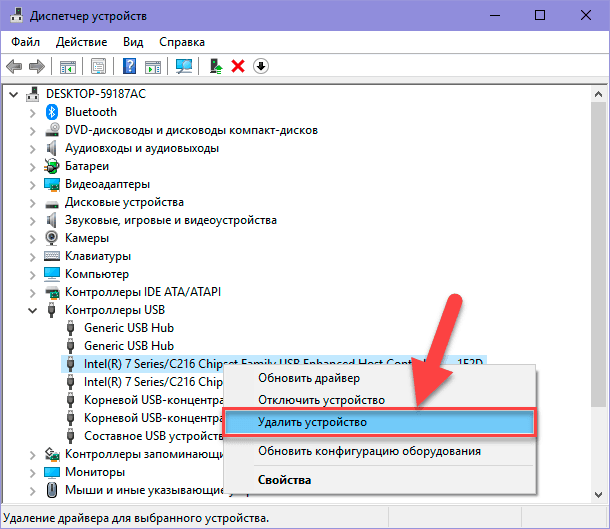
In the USB Controllers section, right-click on the first host controller. In the pop-up menu that opens, select the “Remove device” section from the list of available actions.
Repeat this process for each remaining USB Host Controller . Now restart the computer. This will force the computer to reinstall and reconfigure these controllers, and perhaps the controller that is not responding can fix it.
Clear “Device Manager”
There is a possibility that previously installed devices that are not already connected to your computer may appear in the “Device Manager” . Sometimes device drivers remain installed on your computer, long after the device has been disconnected. It's time to check and clean the Device Manager application by removing old and unused drivers.
If this method did not help you, then proceed to the following steps.
Disable "Temporary disable USB port"
The “USB port temporary shutdown parameter ” is a power saving option in the “Windows” operating system that pauses the power supplied to the “USB device” to increase the battery life of the computer. This is a good feature that allows you to save energy, but in rare cases, this option may block the connected “USB device” .
You can disable the USB Temporary Disabling Option by two different methods: using the power settings and the Registry Editor .
Method One : Using Power Settings
Open the Parameters application in any way below: We have described far from all possible methods, but stopped at the most common and most convenient ones.
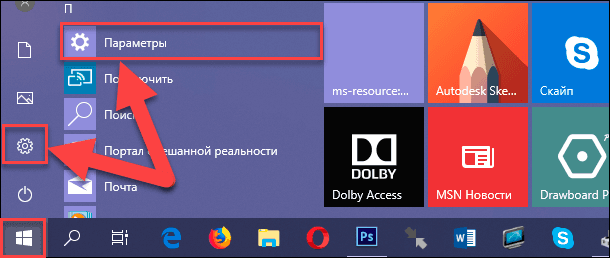
Method one : Click the "Start" button in the lower left corner of the desktop and open the main user menu "Windows" . In the sidebar menu, click the gear icon. Or, using the scroll bar, move the slider down, and select the Parameters section from the list of installed applications and programs.
Method two : Right-click on the “Start” button or press the “Windows + X” key combination together and open the pop-up menu. From the list of available applications, select the "Options" section.

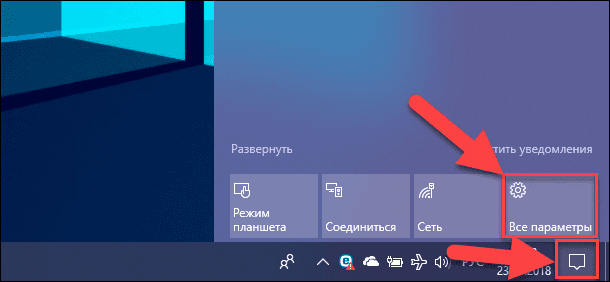
Method Three : Click the Windows Notification Center button in the lower right corner of the desktop on the Taskbar . A pop-up sidebar will appear from the right edge of the screen. At the bottom of the notification center panel is a preset row of quick action buttons. In your case, select the "All parameters" button.
Method Four : Press the "Windows + I" key combination together and open the Parameters application directly.
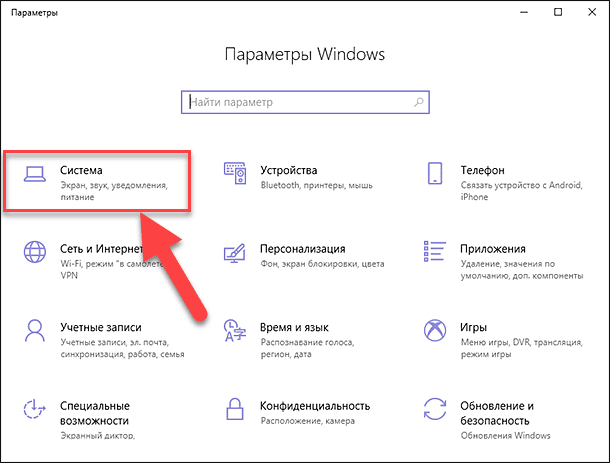
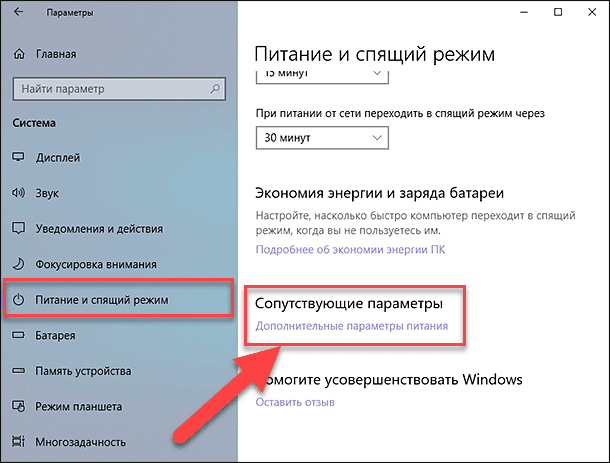
In the main window of the application, select the “System” section indicated in the figure above. Then, in the opened window in the left pane, select the “Power and Sleep” section . In the right pane, lower the scroll bar down to the "Related options" section and click the "Advanced power settings" text link.
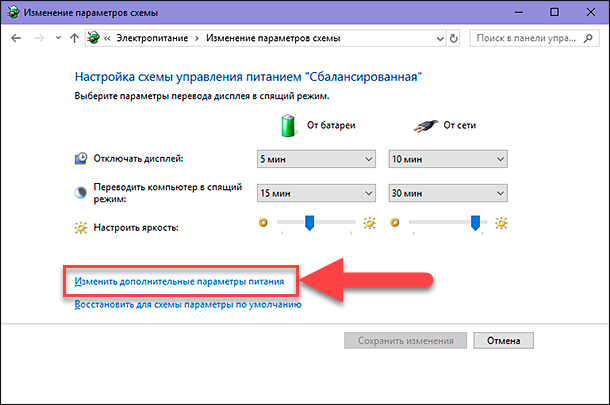
In the Power Options window that opens , select the text link “Configure Power Schemes” .

In the next window, click the text link "Change advanced power settings."
Using the scroll bar, find the USB Options section in the main parameters window. Expand the section using the control ( plus sign in a square box), and then the next section, “Temporarily disabling the USB port . ” Make settings for the parameters in the “From battery” and “From network” cells by selecting the “Forbidden” value in the pop-up menu, opposite each parameter.
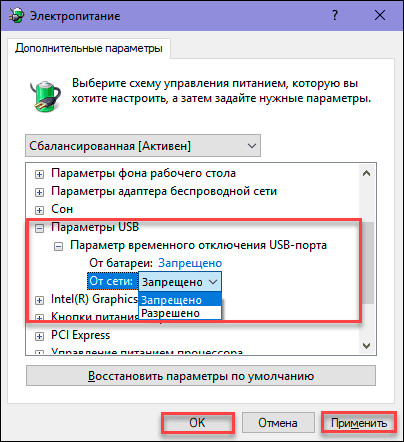
Click the “Apply” and “OK” buttons to save the parameter settings. Now the system will not temporarily disable the “USB ports” to save power.
Method Two : Using the Registry Editor Application
Note : It is important to remember that it is necessary to take any actions with the registry with great caution, since this can lead to irreversible consequences. If changes are made to the registry incorrectly, the operating system may malfunction, problems may arise with the operation of certain computer services, it may stop loading, or the system may fail completely. Pre-take care of creating a backup of the registry, using the built-in features of the Registry Editor . In the main menu of the Registry Editor window , click the File tab, and in the menu that opens, select the Export ... section . Name your copy of the registry and save it anywhere you like. Now, if necessary, you can always use your saved copy.
Open the Run dialog (for example, by pressing the Windows + R key combination together), then in the Open field enter the regedit command and press the OK button or the Enter key.

Click the "Yes" button in the "Windows Account Control " message: "Allow this application to make changes on your device?" , And the Registry Editor window will open.
In the left pane of the window, go to the following key:

You can manually search and open each item on the way to the specified key, or copy the key (HKEY_LOCAL_MACHINE \ SYSTEM \ CurrentControlSet \ Services \ USB \ DisableSelectiveSuspend) and paste into the address bar of the window under the main menu ribbon. Thus, you can avoid possible errors, as there are many similar directories in the window and it is rather easy to get lost and select the wrong section.
If the “USB key” in your registry does not exist, then you will have to create it.
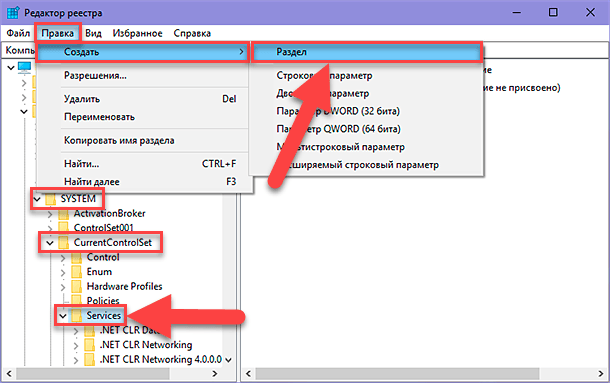
To do this, go to the last available key section “HKEY_LOCAL_MACHINE \ SYSTEM \ CurrentControlSet \ Services” , then click the “Edit” tab in the main menu ribbon. In the pop-up menu that opens, open the submenu "Create" and select "Section" .
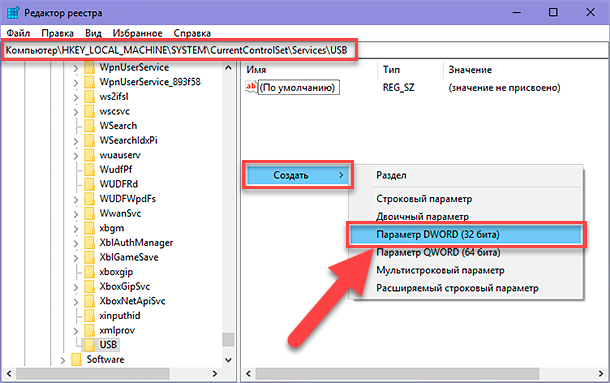
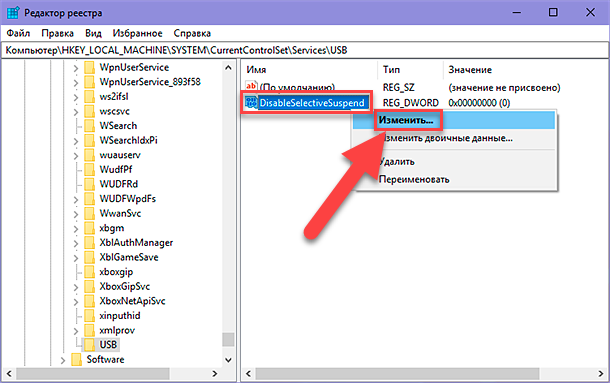
Name the new partition “USB” . Then in this section in the right pane of the window you need to create a new parameter “DisableSelectiveSuspend” . To do this, right-click on the empty space of the window, open the submenu "Create" and select the "Parameter DWORD (32 bits)" .
Now click on your newly created “DisableSelectiveSuspend” parameter with the right mouse button and select the “Modify ...” section in the pop-up menu.
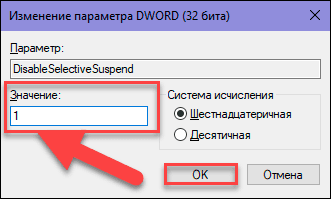
In the “DWORD” parameter change window , enter “1” in the “Value” field. Then click “OK” to save the changes made to the parameter.
Now the “USB port temporary disable option” is disabled on your computer. In order for the changes you make to take effect, you will need to restart your computer.
Check if your faulty “USB port” is working now? If not, then the most likely cause is physical damage to your “USB port” .
Fix damaged equipment
If the port still does not work, then it is quite possible that the problem is connected with the equipment. “USB ports” are quite fragile, and “USB flash drives” can act as pressure levers on them, destroying electrical connectors inside ports. This is observed quite often in laptops, when the user puts the laptop in a bag and forgets to remove the “USB-drive” . Usually such a malfunction can be corrected. You may have to contact a computer repair specialist to fix the problem, or try to do everything on your own by finding ways to repair it online. However, the second method is suitable for those people who have enough experience in repairing computer devices.
Conclusion
There are several ways to recover your non-working “USB port” . The cheapest and easiest solution is to fix the “USB port” in case of a driver or operating system failure. Even if the problem is identified at the hardware level, it can still be fixed fairly simply and inexpensively.
If you have other troubleshooting tips for “USB ports,” or have you ever had to repair a “USB port,” or you know about possible software tools that would help troubleshoot the “USB port,” let us know in your comments.